When Ericson designed the 34 II they tried to keep the cabin very traditional but with some ‘features’ added. One feature is the aft facing nav station that uses the settee as seating. Frankly, I think an aft facing nav station is a ticket to the barf train in a seaway.
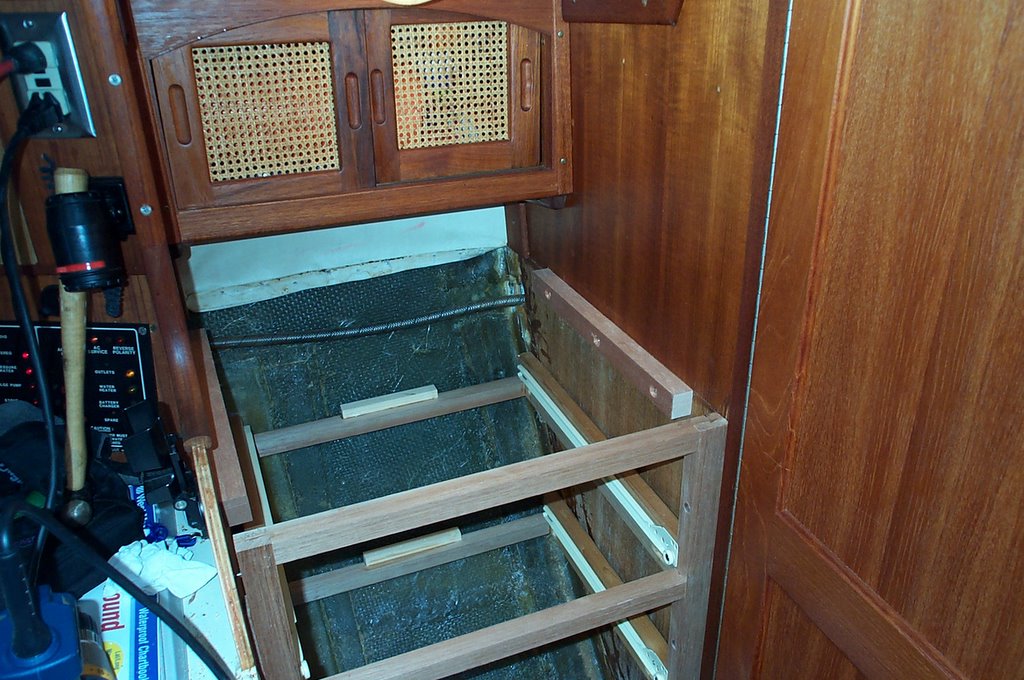
What it does do is free up space aft of the nav station for something else. The something else that Ericson chose was an icebox. This icebox is badly shaped and poorly insulated resulting in having nothing stay cold and vast quantities of ice poured or pumped down the drain. The main icebox in the galley is far better. More than that, this year I purchased a portable refrigerator/freezer that runs on 12v and 120v. I plan to add solar panels to power it on a mooring. More on that later.
Many people
 won’t tackle a project like this because they feel they don’t have the skills or it will reduce the value of the boat. The skills necessary aren’t that great for removal or installation, but construction requires the special tools and skills of a moderate woodshop. My best friend Leigh has both. In spades. More to the point, he likes projects like these as long as he doesn’t have to go on the boat to work on them. As far as reducing the value of the boat goes – chances are that if you don’t like a ‘feature’ and you change it to suit yourself, others will feel the same way. Besides, you didn’t buy the boat as an investment, did you? If so, there’s a bridge I’ve got to sell to you.
 So, the first step is to remove the icebox. When removing furniture from a boat, expect surprises. Remember, they are put together before the deck goes on. It makes life much easier for construction, less so for destruction. In Inertia, all the wood screws have plugs so it’s fairly easy to find them. But sometimes you just need force. Just be careful not to damage the stuff you want to keep.
In this case, the only thing I had to be careful of are the wires and hose that travel against the hull.
Once all was removed, I made templates of the fore and aft bulkheads so Leigh and I could create a frame that fit between the stiles and the hull. Templates are VERY important, so take the time to make them wherever you can’t do direct measurements. That way you’ll have references in the shop. Also, digital cameras are a terrific help!
The design we came up with was a good solid work surface, two 7-1/2” deep drawers, an equipment shelf and at the bottom, a small locker. I decided on flush fronts, which given my experience, I’d probably change now. But that doesn’t affect it’s usage, it’s just looks.
 The next step is to build the whole unit in the shop, drawers and all. I’ve no pictures of that, but back on the boat, I’ve taken the unit apart, installed the front stile, and then the drawer slide frames with cleats, and the top work surface cleats. When installing cabinetry on a boat, you’ll often have to decide which bulkhead you’re going to call ‘square’. I chose the aft one with the head door. This resulted in a small space on the forward end. I shimmed and screwed in from both bulkheads into the stiles.
I glued and screwed the supporting cleats for the drawer slides so that they wouldn’t torque away from the front stile. They are not attached to the drawer frames. This allows for movement as the hull works (and they all do).
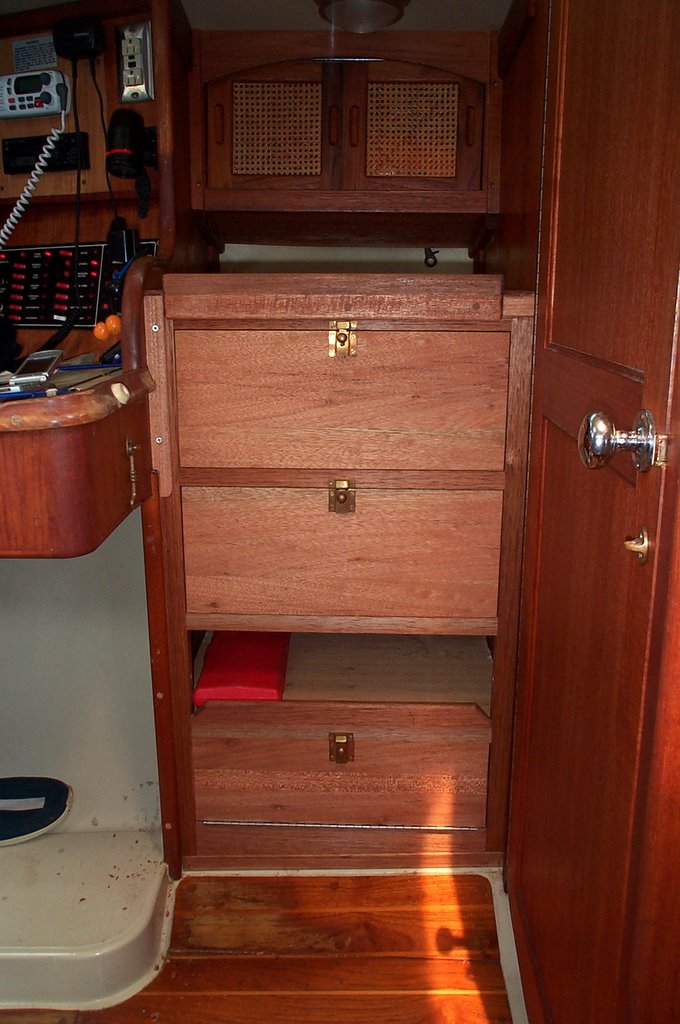 Next, I laminated the top work surface and installed it. I installed the drawers and the lower locker’s hinged door. The whole installation took about 3 hours, the removal took about the same, and the construction took about eight hours. I used mahogany for the visible surfaces and birch plywood for the drawers and substrate of the work surface. The interior surfaces have been sprayed with polyurethane, and the exposed surfaces have been oiled with teak oil, like the rest of Inertia’s interior.
Now that it’s done – I have a 21” deep drawer, a 17” deep drawer, a 13” deep shelf and a beautiful wine locker! Much more useful, and if I may say so myself, very
 salty!
For comparison, see the photo on the right compared to the original icebox. Maybe your next project won't be as complex, but if it is something that makes your boat more enjoyable, then go to it! If you can't do it, there are those that will and very often at reasonable prices. Even Inertia's previous owners like this particular project's outcome, having suffered with the lack of storage. Go to it! Make your boat yours!
See you on the water!

No comments:
Post a Comment