This required bringing in wires from the seahood (the thing that covers the open companionway hatch) where the panels will be mounted, to the battery bank 1 (the house bank).
Speaking of which, I was watching the Xantrex charge monitor and realized it wasn't indicating battery charging - power always went down, never recovered, which is one of the monitor's big pluses. So a quick call to Jack Rabbit Marine, and some patient explaining by Steve, moving two wires, and badaboom badabing, fuggedabouddit. Here's the thing, all the ground wires must be on the load side of the shunt. That's important - even the charging source grounds. So I moved the shorepower battery charger's ground and the starting battery's ground, and that's that. Also, the solar panel's ground was attached there, but more on that later.
Right, then, back to the solar panels. This is a simple wiring job, and because there is no simple way to electrically from the deck to the batteries with an intermediate cabin stop, I ended up with some exposed wire, but I'll cover that later.
The only interesting thing about the whole installation is that I used wire from Ancor that's round with two #12 conductor wire, one red, one yellow. "Huh?", you might say. "Yellow? Why yellow?"
Traditionally the ground wire in 12 volt systems is black. That's fine on a car where it's all 12 volts. What about in mixed 120 VAC/12 VDC systems like a boat? Black wires are hot for 120 VAC (the others, white is neutral and green is ground). So to avoid confusion, let alone some spectacular sparking, fire, and possible electrocution, ABYC, NMMA, and other boat building associations have decided to make 12 VDC ground yellow.
You might wonder, then, why I used red and black on the rebuilt lights. That's a reasonable question. Nothing, I mean, nothing can be more confusing than changing the color of a wire mid circuit. Even though the lighting connections are very obvious, it's better not to 'improve' on what's already there. For new circuits, use the new standard. Red, hot, yellow, ground.
 Back to the solar panels. I decided to put a panel connection on either side of the cabin rather than one connection requiring the panels to be tied together. This is so I can reposition them independently for dockside. Jack Rabbit Marine supplied me with the watertight connectors and the wire clams for going through the deck. I decided on this arrangement because I won't crack anything by stepping on it. Also, it's pretty much out of the way. There's one on the starboard side, too.
 Next, I installed a terminal block in the headliner to join the panel leads. This also allows future expansion, should I need it. Here you can see the red and yellow wires. The panels are connected nearest to you and the battery feed is, obviously, on the other side. The terminal block is mounted on a very thick fiberglass pad that the old traveller is bolted to.
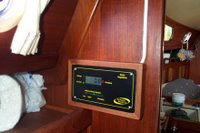
 Next, the solar charge monitor panel was installed in a place where I could run most of the wire out of sight in the hanging locker, through a bulkhead into the battery box. The ground, of course, is attached to the shunt and the hot to the main battery bank. The wire I'll cover as soon as I figure out how, but here's what I have to say about that - there is no, I mean no place on a boat for silicone sealant. It virtually guarantees a leak and one that's impossible to fix. However, a little dab behind the wire and it holds it to the wood like that's what it's meant for.
 Finally, here's where the cells are going. I'll add another picture when I finish the mount, but this essentially is it. The devices will keep the batteries totally charged, and in bright sun, run the refrigerator as planned.
 I'll see you on the water, but with fully charged batteries!


1 comment:
Nice, I just got some panels for my boat, this was pretty informative for ideas on what to do.
Post a Comment