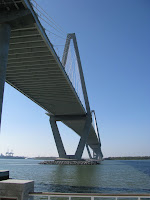
The Ravenel Bridge is a new replacement bridge in Charleston that I-17 runs over. It's one of those new concrete suspension bridges and it replaces a steel trestle bridge. Like most of Charleston, it's pedestrian and bike friendly with a path for both on the south side of the bridge. The view of the harbor is spectacular! Since I didn't really feel like working yesterday, I unfolded my bike and went for a ride.
From t
 he Charleston Maritime Center to the park on the east side of the Ravenel Bridge and back is about 9 miles. The park on the east side consists of a 1/4 mile long pier with porch-swing type chairs, little shelters, and not a few fisherpeople. It's very pretty.
The ride up the west approach to the bridge is easy - not so much the eastern approach. I ended up walking most of that. Big surprise, huh? Anyway, I got to take the panorama above and you may enjoy examining it more closely.
When I left from Whiteside Creek a week ago, the windlass ceased to function while the anchor was still down. That really pissed me off, I can tell you. So Thursday the 19th, I decided to see what was wrong and fix it. Through troubleshooting, I found that my first thought was wrong - I thought it was a problem with the foot switches and corroded wiring or connectors. Alas, that wasn't it. That is easy to fix.
No, by calling a local motor repair shop, I figured out that the problem is that the brushes and commutator for the motor was scored and wouldn't let the motor start - when I removed it from the windlass, if I gave the shaft a bit of a twist and then energized it, the motor would run nicely. So off I went, motor in hand to Excel Apparatus Services, Inc - a $25.00 cab ride away - motor in hand.
After discussing the problem with the shop foreman, I thought we agreed he'd call me with an estimate to repair the motor. When I called the next day to find out the cost, it was a whopping $583.00 - and it had already been completed! A new one is $450.00 from Defenders! Even overnighting the motor from Connecticut would have resulted in a lower cost (think $583 plus three $25.00 trips - the cab driver, Darren, was kind enough to pick up the motor and return it for a one-way charge).
In case you were wondering - I had called several times during the day to find out the cost, and the foreman was never available.
Long story short, I got the motor back and installed it. It works fine. It better work for another 30 years! Lesson learned: Never give permission to repair a unit before you get an estimate.
Ok, well, the windlass works again - I can raise the anchor manually, but with an all chain rode and a 70 pound anchor, I'm not likely to do that too many times...
One of the quirks of a Pearson 424 is that to work on anything on the engine forward of the oil fill (forward on the engine being aft in the boat) you have to remove an engine cover, engine housing and the small portion of bulkhead above the engine. Otherwise there's just no way to work there.
The small bulkhead is screwed in with 4 longish screws and I expect in the last 30 years, it's been removed enough times that only one screw really holds - two were missing when I bought Pelican. Anyway, I had a brilliant idea: Use slide bolts to hold the bulkhead in, and then, to keep the engine noise down, put sound insulation on the back of the bulkhead.
So I did.

 One of the issues with engine noise is that it will travel anywhere there is no insulation - that's not to say that a little isn't better than none - it is, but the more completely you enclose the engine compartment the quieter it will be. With that in mind, I took out the aforementioned bulkhead and insulated it. While I had it out, I installed the slide bolts and then reinstalled the bulkhead. I haven't insulated the inside of the doors as I'm thinking about the best way to do it.
While I had the stuff out and the tools and the vacuum cleaner and what-not, I figured I'd to the engine box, too - one side had fallen out a couple of months ago and I thought I'd replace that
 and the others, too. The hardest job is getting the old stuff off - really, it peels of rather easily but leaves a mess and sheds a mess, too. I sure am glad of my vacuum cleaner!
I used a wire brush and scraper to remove most of the remnants of the old foam - it had long since dried out and came off easily. All that was left was the adhesive which was still sticky. So I didn't bother sanding or using harsh chemicals to remove it. The more stick, the better!
 Next, using the old panels as patterns, I cut the new panels from the sheets of insulation I had. It's 1" thick foam with a solid layer in the center. I'm not sure why it's silver except maybe to reflect heat. Also, it looks pretty. It's easy to cut with a straight-edge and a box knife or utility knife. Once it's cut, all you have to do is remove the backing and carefully put it in place. Smooth it down, and tape the edges with the special tape and presto! You're done!
 It really is a satisfying project to do and even with the access panels not covered, the volume of sound from the engine in the cabin is reduced by a huge amount. I have some scraps left over and I may apply them to other portions of the engine compartment including those access panels to reduce the sound even further.
See you on the water, but more quietly!


1 comment:
Bob,
We saw your "spot" on land and now you seem to be going in the opposite direction. What happened? We are very worried about you!
Post a Comment