The cover is off! The cover is off! The cover is OFF! Man, is that a great feeling or what? Sure, the boat's a mess and needs cleaning in the worst way, but real live sunlight is coming in all over! Man, oh, man.
Today it's cold and drizzling, which is ok because we need the rain and it is April, after all. I figure I'll stay nice and warm in the boat, catch up on my reading and writing, and nap and so forth.
While I'm drinking my first cup of joe, the bilge pump came on. That's ok - it does that once in a while because the rudder packing gland leaks. I'm working on that. But worse, in a couple of minutes it comes on again. And a couple of minutes later. And so on.
Well, this needs investigation so I looked into the bilge and I see water running into it at a pretty decent rate. Ok, everything out of the lazerette so I can see if the rudder packing has gotten worse. Nope. Check the dock side water fitting that I put in last weekend (see below), and nothing's leaking there either. Investigate the bilge some more and see the water is coming down the side - not the center as I'd expect from the rudder post.
Well, it turns out the hot water heater is right near there. I opened up the locker and hey! voila! water is spraying out of the cold water line to the heater. Turns out whoever plumbed the original tube in just loosely put on the hose clamp - enough not to leak at pressure of the water pump but not the shoreside water pressure. Not only that, but they put the hose on a pipe nipple as opposed to a hose barb. No worries - I loosened the clamp, slid the hose up another two inches, tightened the clamp, and added a second behind it. Problem solved. And boat is still floating.
Now, about the shore-side water fitting. I love them! It saves filling and managing the tanks when living aboard. Moreover, you always get clean water at a regulated pressure so no worries about running out of water when all soapy... and the piping will provide the cold water side of the cockpit shower.
I did this once on Inertia (and in the process flooded the battery charger by not tightening all the fittings before applying water pressure...oops) and was happy with the whole installation. This time, however, because I may plumb it so I can fill the tanks with water, I added a filter inline. The water comes through the regulator via a standard hose, goes through the filter and connects to the cold water side of the water heater. It's all done with flexible plastic tubing and fittings that are easily and inexpensively acquired at Home Depot. Since it's good enough for a house, it's good enough for a boat.
One of the great tools for doing this job is the Rigid Flexible Tubing Cutter - it's like a pruning shear except with one very large blade. The plumbing fittings require square cut ends to work properly - this tool holds the tubing square before cutting. The blades (very sharp) are replaceable. It's cheap and totally worth it for cutting any kind of plastic tubing. Highly recommended.
My new mast pulpits have just arrived - hopefully this weekend I'll be putting them on. Expect a full report!
I hope to get out on the water the weekend of May 9 - maybe I'll see you there!
Sunday, April 27, 2008
Saturday, March 29, 2008
One of the First Signs of Spring
I don't know about you but my nav station collects stuff. By season's end, the inside contains little bits and pieces of things that have long ago been replaced, fixed, or otherwise rendered unto Neptune. It seems that the natural place to put things that you don't know what to do with is the nav station surface. So much so that before you can go for the first sail of the season something must be done or face charts, bulbs, little bits of wire, tape, Eldridge's (last year's), the screwdriver you use when you're too lazy to find a proper tool and whatever else hides in the corners ends up on the cabin sole or in the bilge.
So last weekend while installing my radio/CD player I had to clean it up. The first thing I found is that I have a bunch more spare parts than I knew. The other thing is that there's lots of room there for, well, navigating. Who knew? So, for the first few weeks of this season I'll have a ship-shape nav station while it waits to accrete this year's detritus.
My point here is that it's another spring and the beginning of a new season. There was a lull in work on the boat because it was cold and dark and unfriendly and frankly, all I really wanted to do aboard was sleep. I felt bad because I hadn't gotten anything done.
But in the last few weeks I've installed the new VHF with DSC calling and locating, new self-tailing winches (purchased as a celebration of a new job), and the stereo mentioned before. I'll finish up the holding tank plumbing now and will be setting sail late April for the season's first cruise. I can't wait!
Because of travel plans, I won't get the cover off until April 20 or so. But then, watch out! The weather keeps getting nicer and nicer. I sure do hope work doesn't get in the way of fun this year!
So, installing winches. Here goes. It is my feeling that you can't have enough of the things. Moreover, the standard placement of the winches Pelican meant that you have to go into autopilot to adjust the sails. This is a terrible way to singlehand, especially if the autopilot fails. I know since I've done it.
 I recently came into a little bit of money and purchased two Andersen 46STs to use as primaries near the wheel (which I replaced with a 48" wheel). The first thing to consider is the actual placement. In Pelican's case, the mizzen stays and main backstays are right where you'd put a winch in a perfect world. Since it's not, I took a winch out of the box and put a winch handle in it and placed it where I could spin the handle without hitting my hand or anything else. I placed them outboard as far as I could on the coaming. I marked the circle where the base would be.
 Next, I looked under the coaming to see if there was anything I wouldn't like to drill into, like electrical or fuel lines. This is a sometimes overlooked step that results in all sorts of grief. I've said it before: Good judgment comes from experience; experience from bad judgment.
Anyway, the winches come with a template, but since you have to take the top off to mount them, I just took it off, lined up the base with the circle I drew earlier, and with a marker marked the five mounting holes.
 Since the mounting bolts are 5/16" I drilled all the holes to 7/16", taped the bottom and filled with liquid epoxy. After that set (well, a little longer because the neighbor came over and offered some wine so that pretty well finished that day's work) , I re-drilled the holes to 5/16".

 Next I put 3M 4200UV around each hole and put the winches in place. With the help of my aforementioned wine producing neighbor, I crawled in the locker and he held the bolt head while I cranked from below.
 Now as you see the picture from below, you'll notice I used fender washers instead of a full backing plate. When drilling through the coaming, I noticed the core was solid mahogany rather than plywood. It was 3/4" thick, as well. Since winch loading is sideways and not straight up I'm not worried. The original winches had no more than a regular washer and a lock washer and they've stood up for 30 years.
 Because of the stays, I'll have to put a turning block on the port side to clear all the interference and to avoid the forward winches. I'll do this when the cover comes off later this month.
Soon, we'll be seeing each other on the water! I, for one, can't wait!
So last weekend while installing my radio/CD player I had to clean it up. The first thing I found is that I have a bunch more spare parts than I knew. The other thing is that there's lots of room there for, well, navigating. Who knew? So, for the first few weeks of this season I'll have a ship-shape nav station while it waits to accrete this year's detritus.
My point here is that it's another spring and the beginning of a new season. There was a lull in work on the boat because it was cold and dark and unfriendly and frankly, all I really wanted to do aboard was sleep. I felt bad because I hadn't gotten anything done.
But in the last few weeks I've installed the new VHF with DSC calling and locating, new self-tailing winches (purchased as a celebration of a new job), and the stereo mentioned before. I'll finish up the holding tank plumbing now and will be setting sail late April for the season's first cruise. I can't wait!
Because of travel plans, I won't get the cover off until April 20 or so. But then, watch out! The weather keeps getting nicer and nicer. I sure do hope work doesn't get in the way of fun this year!
So, installing winches. Here goes. It is my feeling that you can't have enough of the things. Moreover, the standard placement of the winches Pelican meant that you have to go into autopilot to adjust the sails. This is a terrible way to singlehand, especially if the autopilot fails. I know since I've done it.
 I recently came into a little bit of money and purchased two Andersen 46STs to use as primaries near the wheel (which I replaced with a 48" wheel). The first thing to consider is the actual placement. In Pelican's case, the mizzen stays and main backstays are right where you'd put a winch in a perfect world. Since it's not, I took a winch out of the box and put a winch handle in it and placed it where I could spin the handle without hitting my hand or anything else. I placed them outboard as far as I could on the coaming. I marked the circle where the base would be.
 Next, I looked under the coaming to see if there was anything I wouldn't like to drill into, like electrical or fuel lines. This is a sometimes overlooked step that results in all sorts of grief. I've said it before: Good judgment comes from experience; experience from bad judgment.
Anyway, the winches come with a template, but since you have to take the top off to mount them, I just took it off, lined up the base with the circle I drew earlier, and with a marker marked the five mounting holes.
 Since the mounting bolts are 5/16" I drilled all the holes to 7/16", taped the bottom and filled with liquid epoxy. After that set (well, a little longer because the neighbor came over and offered some wine so that pretty well finished that day's work) , I re-drilled the holes to 5/16".
 Next I put 3M 4200UV around each hole and put the winches in place. With the help of my aforementioned wine producing neighbor, I crawled in the locker and he held the bolt head while I cranked from below.
 Now as you see the picture from below, you'll notice I used fender washers instead of a full backing plate. When drilling through the coaming, I noticed the core was solid mahogany rather than plywood. It was 3/4" thick, as well. Since winch loading is sideways and not straight up I'm not worried. The original winches had no more than a regular washer and a lock washer and they've stood up for 30 years.
 Because of the stays, I'll have to put a turning block on the port side to clear all the interference and to avoid the forward winches. I'll do this when the cover comes off later this month.
Soon, we'll be seeing each other on the water! I, for one, can't wait!
Saturday, March 01, 2008
A Useful Skill
Everyone who sails can tie or wishes they could tie a bowline without using the rabbit-tree-fox trick. It's true that with much practice even the internal thinking, "Ok, the rabbit comes out of the hole and goes around the tree..." will go away. The point is, the bowline becomes the knot for every purpose - dock lines, anchor rodes, combining lines, tying genoa clews, and so forth.
That's fine, but where a permanent loop is required, a splice is far more professional and proper. The new braided lines take a lot of work to splice and requires special tools in the form of hollow fids. But three strand nylon line - that of the most common dock, anchor, and snubber lines - is spectacularly easy to splice. Eye, end, and long/short splices are quite easy to do and once one is known, the rest are easily mastered.
 In my reading about chain anchor rode I found that leaving the stress of anchoring on the bow rollers is considered bad form - the roller isn't designed for that kind of stress and the capstan, if your boat is so equipped, shouldn't be trusted to hold the strain. The solution, of course, exists in the form of snubber lines typically made of three strand nylon.
Snubber lines are deployed by hooking to the chain outboard of the bow roller and led through the bow chocks or hausepipes to the bow cleats. More chain is deployed until the strain is taken up by the snubber lines. Finally, the capstan is locked as a precaution.
This arrangement, although a bit more of a task to deploy, will help the boat ride more calmly at anchor (especially if your vessel has a tendency to sail about the anchor) and provides three points of failure.
There is another benefit to this arrangement: You can take one of the snubbers aft to another point to help the boat ride more smoothly in a crossing current/wind situation - instead of rolling with the waves, the boat can be pointed into or away from them.
That's why you want snubbers.
For a very nice manual for splicing, check this out: http://www.gleistein.com/en/files/Splicebook_EN_short.pdf
Here's how to make them (always make two - that way normally two in the bow, but one for the stern if you're deploying that anchor).
 First, decide what size line - for my 42 foot boat, I chose 5/8ths inch line - I could have gone to 3/4ths but that would have made them to hard to manage.
Purchase the appropriately sized thimbles and shackles. The hook is a bit more difficult as you have to make sure it fits your chain. Just so you know, there's about a dozen chain sizes in the range we'd use. Mine are 5/16ths with short links - I think high tensile chain. The point is, get the right size hook.
I decided to make mine about 28 feet long. Normally, you'd only use about 10 feet, but better too long than too short. Also, the line can be an extra dock line or tow line or a lifting line.
I put an eye splice on one end large enough to go over my cleats and all the hardware on the other end.
Once you can do an eye splice properly, it should take you about half an hour to make an entire snubber. Don't worry if it takes longer. The more splicing you do, the faster it gets.
I make my own dock lines. Sure, you can purchase them. But can you purchase them exactly the right length? Or with an eye on one end and an end splice on the other? Or two eyes? Whatever you think you need or want, you can make.
Personally, for dock lines, I believe they all should be the length of the boat. If you have custom spring, bow, and stern lines then you have to sort them all out when docking. If they're all the same, it doesn't matter which one you take forward. One line can be a bow or stern and spring line. It's better to sort out the lengths after you're safely docked than when you're in the middle of docking.
Others disagree. But I dock my Pearson 424 alone so this is what works for me.
There is something else to making your own lines: You'll garner awe from other boaters who have no idea how to do it. Here's something to try: work on splicing on deck while at a marina. You'll be surprised at how many people will come over to see what you're doing and exclaim amazedly at your ability to splice!
So - make some snubbers if you use chain rode. Learn how to splice - it's a wonderful skill and fun to do. When you learn it, you can pass on the skills.
It's March today! The season's almost here! Woohoo!
I can't wait to see you on the water!
Friday, February 29, 2008
Requiem for a Friend
 How should I start to tell you about Bob Gainer? Should I start with the end? The sadness and empty space caused by his untimely demise? Should I start with the happy times? Or about how incredibly smart he was? His encyclopedic knowledge of sailing and ships?
Bob Gainer was my friend for 30 years. We fooled about with boats together, messed with computers together, spoke about sailing and sailboats over rum and coke and Black Russians. In almost every case, I came away with more knowledge and more esoteric knowledge than I'd previously had.
This was his way, and what everyone I know in common with him felt. He was a master rigger and woodworker. Kind to a fault, with a tremendous sense of humor.
All these things, however, don't go halfway to describing the person he was.
As a teenager, he, um, liberated a small open boat and sailed solo to Nova Scotia and back much to the consternation of the owner who had told him to take the boat to paint it. At 21, in 1974, he sailed solo across to England in a 22 foot Sea Sprite. This was with no self-steering or electronics, save a VHF radio.
Later on, he took a two-tonner out to deliver it to Europe. Here's his story in a nutshell:
This is pretty typical of Bob. Not that he was a disaster ready to happen, but he took most everything in stride.
"I owned an Allied built Chance 30/30. It was a great boat to sail but had a few
problems offshore if you get into very bad weather.
"Admittedly you wouldn’t make it a habit to sail in a hurricane but it gives you a very good idea of what a boat is capable of in cruising.
"In October of 1976 I was in Hurricane Gloria with 90 Knots wind speed and 45 foot (or better, its hard to tell) waves. Just to the north of me was the 590 foot 15,028 ton Sylvia L Ossa with a crew of 37. She sank with a loss of all hands sometime between the 13 to the 15 of October.
"During the height of the storm the truck fitting failed by cracking between the hole for the headstay clevis pin and the corner of the casting adjacent to the mast. The loss of the headstay was to say the least very awkward at that time.
"In trying to turn the boat downwind after the headstay went the rudderstock failed at the bottom of the bolt under the tiller and the stock sheared off.
"Within the next hour the motion of the boat was so violent that the hull failed with a crack forming between the aft-most keel bolts. You could see the sides of the crack moving up and down as the boat rolled. She started to make water at that point.
"After getting beat up for that hour I had the boat back under control and hove to. Before the storm was fully over the steering was repaired and a new head stay was up. The leak was getting bad so I started for the nearest dry land as fast as I could go.
"At this point Hurricane Holly was predicted to be coming my way. I had enough of bad weather so I sent out a Mayday by SSB and that was received by a Dutch tugboat and they relayed it to the German ship Hagen of the Hapag-Lloyd line. She had passed me in the night some 100 miles to the west but she turned around and came back to get me.
"When she got to me the wind was climbing and had reached 60 knots. When my boat came alongside the Hagen the crack at the aft two keel bolts propagated along the
entire length of the keel. The bottom of the boat flexed downward and opened up
at the bolts and she started to sink.
"In the hour so before we met we spoke by VHF and they asked for the dimensions and weight of the boat. There plan was to weld a cradle to the deck and if they could, they wanted to pick up the boat with two wire slings and swing her inboard to the steel cradle.
"When we did get together the captain kept his ship away from my boat a few feet and had two of his crew come onboard with wire cutters. They helped me off and then cut the standing rigging while some crew on deck held the mast. They brought the rig on
deck and on the next roll she was out of the water.
"I don’t think she hit the ship but once during the entire time. That one strike crushed about ten feet of hull-deck joint. I had been beat up so much from going up the mast to rig a headstay that I couldn’t walk and that’s why I needed help to get off my boat.
"The entire rescue was over in under ten minutes and they never came to a full stop.
"The bottom line is the keel area of the boat is not strong enough and the rudderstock needs to be solid instead of heavy wall tubing. When the boat was on deck I found that the fairing forward of the rudder had also failed and the keel had dropped over 1/2 inch by digging out the fiberglass under the washers for the keel bolts.
"Other then that I thought the boat was great."
As it turned out, he had been declared dead, had his obituary in the "New York Times" and ended up with a book written about the adventure, "Presumed Lost". It's no longer in print and Bob really didn't care for it because it was more about how he ended up on the ill-fated Chance 30-30 than the storm itself.
The sea was in his blood - he was preparing a Tartan 34-C for a trip to west Greenland. He was teaching young people about boats, boat construction and the sea through the auspices of the Hudson Fisheries Trust. He was about to be part of the deployment team for The Beacon Institute for Rivers and Estuaries.
I could write for hours, if not days, about Bob and his adventures, jokes, knowledge and kindnesses. But I think I'll stop and leave you with this quote:
"...The sea absolutely doesn't care about you one-way or the other. But the sea will exploit all your mistakes and weaknesses and is relentless in its probing to find those mistakes.
"...No mater how well you have prepared, no matter how skilled you are the sea will always win.
The sea is very patient and will always win in the end. The sea has all the time in the world to wait for you to make that mistake, your last mistake.
"The sea may give you a free pass a couple of times, if it wants, but when it decides to strike, the sea will sink you. People just don't understand, they can't understand how fast the sea can go from the pretty picture postcard you buy at the beach to the raging devil himself.
"And the next morning, if you are there to see it, can be the most beautiful sunrise that has ever been since the beginning of time.
"I have several friends that have lost playing this high stakes game. Without exception they had the skill and boat that was necessary to do the trip. I don't know why they lost the game; all I know for sure is that the sea won, again. The sea will always win in the end; it's just a question of time."
You are missed, my friend.
(Photo courtesy John Fasulo)
Saturday, February 16, 2008
Work Proceeds Apace
There's been a hiatus of sorts. It's been cold, but not really, and the holidays are pretty much over. I've been hunkered down and if I could hibernate, I would.
As February comes to a close and I can feel spring coming, if not externally, certainly internally. I feel pressed to start installing all the things I've purchased. That includes a holding tank, new VHF radio with hailer and fog signals, the TV antenna (which has been shelved since the cover went on), manual bilge pump operable from inside the boat (a SOLAS requirement), a radio/cd player with speakers in the cockpit and down below, and a bunch more stuff.
Anyway, I was putzing around the Pearson 424 site and one of the things another owner did was to put access hatch in the outboard wall of the shower. There is a HUGE amount of wasted space there - I knew it was a big volume, but I didn't realize how big. A small person could live there!
So today, when I got finished installing the new holding tank vent lines and through-hulls and the waste pumpout fitting, I figured I'd install this hatch.
 I purchased a 11" x 15" waterproof hatch and cut out the hole for it and installed it in about an hour and a half. There's a tool called a Roto-Zip which is like a Dremel tool on steroids. It fits between the Dremel and a full-blown router. It spins a little bit very, very fast and will cut through fiberglass with speed. The only downside is that until you get used to it you'll cut lines that are as far from straight as they can be. I use it all the time. Of course, it works with wood as well.
 Anyway, that's what I used to cut the hole that I marked from the pattern supplied. Cutting fiberglass is a MESSY job. Another tool I bought last year is a wet/dry vacuum powered by a 24v Li battery made by Rigid. They make great battery powered tools that are guaranteed for life. No joke - my friend Leigh had an old one (18V) and the battery crapped out. Rigid sent him a new one, no charge. Highly recommended. I use the vacuum now whenever I work on the boat because it's so easy and I clean up after an awful job like this in a heartbeat.
As I've mentioned, I've started the holding tank job. There will be a whole entry on that. One of my flashes of brilliance has struck. The holding tank is normally pumped out through the deck. I'll be installing a macerator pump for those times I'm offshore, but what about when the electric pump fails? Ah ha! I'll install a manual pump, too. But get this: when inshore, those pumps will take a suction on the bilge. That way the manual pump serves two purposes!
So far, I haven't thought of a downside. Maybe someone will. Let me know. It seems like such a good idea...
While I'm about the holding tank project - I decide to install the new tank level sensor I got from Sailor's Solutions. You know I've raved about them before. Well, I had a question about the sensor placement and on a two minute call I got the name and number of the person who designed the system. In two shakes of a lambs tail I got the answer and life is beautiful. I will say this: Put the strips on before you install the tank. It will make your life much easier.
It turns out that one of the 424 owners is part of the group SCADtech who designed the tank monitor and Sensi-bulb. That's pretty cool.
Now that I'm on a roll, I hope to get the holding tank installation finished in the next couple of weeks. Unfortunately, work gets in the way of messing about in boats.
Spring is nearly here. I know it doesn't seem like it. But soon, I'll be seeing you on the water. I can't wait!
Friday, January 04, 2008
Happy New Year 2008!
Here I am starting my third year with this blog - and this year will be an amazing one, I assure you!
More than anything, I hope you all have a wonderful 2008 filled with happiness, health, and the love of your family and friends! Great success would be nice, too.
As I write this it's cold here. Arse biting cold, in fact. Two heaters on Pelican are just barely keeping up so there's going to be an upgrade here real soon now, definitely before the next cold snap. Next week it's going to be in the 50's. Go figure.
 I've been to England for Christmas at my sister and brother-in-law's home. There are some lovely places to sail on the Irish Sea and beautiful harbors to stop in. I'm going. What a place! Tentative plans are for the spring of 2009, with fall back to spring 2010. There's lots to do on Pelican and you'll be privy to all that.
Here is an observation I have about the U.K.: no matter where you point a camera you're going to take a postcard picture! You can't help it. This comes from someone who is absolutely incapable of composing a picture.
One of my devoted readers, Brooke, (there are two) offered a suggestion for a new digital camera. My Kodak DC280 is a fine 3 megapixel (MP) camera but it's getting long in the tooth and even low-end digital cameras today have 8 MP capabilities. I like doing panoramas and the Kodak can't take pictures fast enough. It takes about 10 minutes to take the 8-10 necessary.
So on Brooke's advice I purchased a Canon SX100 and a 2GB SD card for saving pictures. Let me simplify this: it's great! I love the thing. It has 10x optical zoom with image stabilization, it has all sorts of modes, does movies and takes terrific pictures (see above). Other than my propensity to push the power button rather than the shutter one (my fault, not Canon's), it's a terrific 8 MP camera. And if you want to play with settings, you have about a bazillion. Almost as flexible as a professional camera. Highly recommended. Thanks, Brooke! You rock!
As I am planning to do all sorts of navigation lighting upgrades I was thinking to myself about how many breakers the nav lights take on the panel - it turns out they take 5 breakers of 10 or 15 amps. Since I want to add, eventually, a Single Side Band radio (SSB), and maybe a watermaker and probably other stuff I'd like to free up some breaker space. One of the participants on the Pearson 424 owners' site mentioned he'd moved all the nav lighting to a new panel.
First, I turned off every DC load and then I turned on all the navigation lights. This resulted in an 8 amp draw. Normally and legally you wouldn't light every lamp because it would make a confusing light pattern. The lighting is as follows:
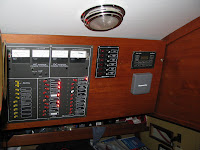 I got a 6 fused switch panel from West Marine for $50 or so and some crimp fittings to do the job. I installed it next to the main panel and just moved the wires from their current breakers to a switch on the new panel. The whole project took about 3 hours, 4 if you include the schmoozing at West Marine...
The net result is that I have one main breaker for all navigation lighting and each light or light set is controlled from a common panel. I have 4 free breakers now and the last switch on the new panel will be for the compass light. As it is now, the compass light only goes on with the lower navigation lights. It should go on any time I want it on. Or off, for that matter.
The new panel is the one between the main panel and the Xantrex Link 2000. It solved another problem, too. It filled a huge hole in the wood that was left from removing a Datamarine Log instrument. Tada!
In 1978 when Pelican was constructed there were no electrical standards for pleasure craft, especially with regards to ground fault interruption. Well, I'm going to add two GFCI outlets, one on each AC circuit. It means cutting out the current outlets because they are siliconed into their hole, adding plastic boxes, and installing the new outlets. I'll let you all know how it goes.
When I purchased Pelican, the main salon table wasn't attached to the cabin sole. It may have been at one time or another but the fittings had disappeared over the intervening 30 years. So, how to replace them? First figure out what they're called and then go to Jamestown Distributors and get them. It took a while, but they're called table leg fasteners. Who knew? Anyway, once acquired I mortised them into the cabin sole and ba-da-boom, ba-da-bing, fuggeddaboudit!
Net result: I can use the table opened without it sliding around and tipping over.
Part of the the joy of boat ownership is doing these small, pleasant, easy, and satisfying jobs that make life aboard a little bit more pleasurable.
Finally! Big News! I am officially a Master of Steam, Motor and Auxiliary Sail up to 50 Tons inland and OUPV vessels near coastal to 100 miles offshore! (Captain's License) I also got my MMD card (Merchant Marine Document) as an Ordinary Seaman. It means I can work on commercial vessels and I can do things like mop decks, serve food, wipe steam engine piston rods, and other very low level stuff. It also means I can go to a military base PX. Will I ever? Who knows? Also, it's a start towards getting my AB card - Able Bodied seaman. That's my next goal. Then I can stand bridge watches.
Ok. That's all the news for now. It's January, so only two months to go! Woohoo!
More than anything, I hope you all have a wonderful 2008 filled with happiness, health, and the love of your family and friends! Great success would be nice, too.
As I write this it's cold here. Arse biting cold, in fact. Two heaters on Pelican are just barely keeping up so there's going to be an upgrade here real soon now, definitely before the next cold snap. Next week it's going to be in the 50's. Go figure.
 I've been to England for Christmas at my sister and brother-in-law's home. There are some lovely places to sail on the Irish Sea and beautiful harbors to stop in. I'm going. What a place! Tentative plans are for the spring of 2009, with fall back to spring 2010. There's lots to do on Pelican and you'll be privy to all that.
Here is an observation I have about the U.K.: no matter where you point a camera you're going to take a postcard picture! You can't help it. This comes from someone who is absolutely incapable of composing a picture.
One of my devoted readers, Brooke, (there are two) offered a suggestion for a new digital camera. My Kodak DC280 is a fine 3 megapixel (MP) camera but it's getting long in the tooth and even low-end digital cameras today have 8 MP capabilities. I like doing panoramas and the Kodak can't take pictures fast enough. It takes about 10 minutes to take the 8-10 necessary.
So on Brooke's advice I purchased a Canon SX100 and a 2GB SD card for saving pictures. Let me simplify this: it's great! I love the thing. It has 10x optical zoom with image stabilization, it has all sorts of modes, does movies and takes terrific pictures (see above). Other than my propensity to push the power button rather than the shutter one (my fault, not Canon's), it's a terrific 8 MP camera. And if you want to play with settings, you have about a bazillion. Almost as flexible as a professional camera. Highly recommended. Thanks, Brooke! You rock!
As I am planning to do all sorts of navigation lighting upgrades I was thinking to myself about how many breakers the nav lights take on the panel - it turns out they take 5 breakers of 10 or 15 amps. Since I want to add, eventually, a Single Side Band radio (SSB), and maybe a watermaker and probably other stuff I'd like to free up some breaker space. One of the participants on the Pearson 424 owners' site mentioned he'd moved all the nav lighting to a new panel.
First, I turned off every DC load and then I turned on all the navigation lights. This resulted in an 8 amp draw. Normally and legally you wouldn't light every lamp because it would make a confusing light pattern. The lighting is as follows:
- Normal low nav lights (two on bow, one stern)
- Masthead tricolor light
- Masthead anchor light
- Steaming light
- Masthead strobe light
 I got a 6 fused switch panel from West Marine for $50 or so and some crimp fittings to do the job. I installed it next to the main panel and just moved the wires from their current breakers to a switch on the new panel. The whole project took about 3 hours, 4 if you include the schmoozing at West Marine...
The net result is that I have one main breaker for all navigation lighting and each light or light set is controlled from a common panel. I have 4 free breakers now and the last switch on the new panel will be for the compass light. As it is now, the compass light only goes on with the lower navigation lights. It should go on any time I want it on. Or off, for that matter.
The new panel is the one between the main panel and the Xantrex Link 2000. It solved another problem, too. It filled a huge hole in the wood that was left from removing a Datamarine Log instrument. Tada!
In 1978 when Pelican was constructed there were no electrical standards for pleasure craft, especially with regards to ground fault interruption. Well, I'm going to add two GFCI outlets, one on each AC circuit. It means cutting out the current outlets because they are siliconed into their hole, adding plastic boxes, and installing the new outlets. I'll let you all know how it goes.
When I purchased Pelican, the main salon table wasn't attached to the cabin sole. It may have been at one time or another but the fittings had disappeared over the intervening 30 years. So, how to replace them? First figure out what they're called and then go to Jamestown Distributors and get them. It took a while, but they're called table leg fasteners. Who knew? Anyway, once acquired I mortised them into the cabin sole and ba-da-boom, ba-da-bing, fuggeddaboudit!
Net result: I can use the table opened without it sliding around and tipping over.
Part of the the joy of boat ownership is doing these small, pleasant, easy, and satisfying jobs that make life aboard a little bit more pleasurable.
Finally! Big News! I am officially a Master of Steam, Motor and Auxiliary Sail up to 50 Tons inland and OUPV vessels near coastal to 100 miles offshore! (Captain's License) I also got my MMD card (Merchant Marine Document) as an Ordinary Seaman. It means I can work on commercial vessels and I can do things like mop decks, serve food, wipe steam engine piston rods, and other very low level stuff. It also means I can go to a military base PX. Will I ever? Who knows? Also, it's a start towards getting my AB card - Able Bodied seaman. That's my next goal. Then I can stand bridge watches.
Ok. That's all the news for now. It's January, so only two months to go! Woohoo!
Saturday, December 15, 2007
Mid December, 2008.

Here it is, a month since my last post. I'd love to say I've been super busy doing all the projects I slated for the winter, but confess, I cannot. The biggest project completed so far is the replacement of the 36" wheel with a 48" wheel from a consignment shop in Washington, Second Wave. Also, I've put on the bronze manufacturer's plate from Bristol Bronze.
I heartily recommend both businesses - Second Wave because they were friendly, competent, and responsive. The owner of Bristol Bronze, Roger, will talk as long as you care to about bronze, alloys, corrosion resistance, almost any metalurgy, and the proper application of metals. He's a wealth of knowledge and very entertaining. Plan to spend an hour on the phone.
 The boat is covered - the story of the $500 Fairclough cover is legend here at the marina, and if anyone cares, I'll relate it, but suffice it to say, if you're looking for something, check out the ads in Soundings Magazine. Sometimes you find the most incredible deals.
The cover is easy to put on - Herb and I put the frame up in three hours even though we'd never seen it before. It takes longer than that for his on a similar boat (Passport 40). The frame came directly from Fairclough for $1260, and is constructed out of 1" galvanized conduit with special castings for connecting the rafters. It took me about three hours to put the cover on by myself. So, next year, it shouldn't take more than about 5 hours to put up. Not bad, and it pays for itself in two years (it's over $1000 to shrinkwrap my boat! Can you believe that?).
I'm off to England next week to see my sister and brother-in-law and to go narrowboating with a newly found friend. It should be interesting.
Although the winter solstice is just now coming up, meaning winter's just starting, I am already looking forward to the spring. I thought I'd get a lot more done under the cover, but I have to say, I'd rather be off the boat than on - living in institutional green lighting is not conducive to great bouts of joy. The upside, of course, is that the boat is pretty much toasty warm and very comfortable even in 20 degree weather. I have to admit to wearing socks to bed, though, because my feet are near the chain locker which is vented. But it all works out.
Living aboard is turning out to be really pleasant. I can imagine there are those who think it odd, but I do have running water, a stove, a refrigerator and so forth so it's not like I'm camping out. Oh, yes, I have a TV and DVD player which are incredible time wasters.
But really, it's winter. There's time to waste.
We've had a couple of snowstorms here, mostly remnants of the big storms in the mid-west that left so many people without power. We're expecting another big one this weekend, but should be all cleared out by Monday. Good weather for my flight on Wednesday.
I've decided to start practicing my guitar again because it's pretty clear I'm not going to get any meaningful work done on the boat. It's nice to pull it out at dock parties and do a couple of numbers. Get's 'em going every time!
When I come back from England, the days will be growing longer! I can't help but be excited about that. Sure, there's January and February, but I'm hoping (foolishly) that we'll have warm ones and I'll be about taking the cover off early March. That's only 70 days away or so.
It's nice being at a dock, I must say. Very nice. Also, very expensive. But not as expensive as owning a house, that's for sure.
One of the downsides to living aboard is that every day you see new projects you want to do - of course, they're all do-able. All it takes is money. Here's my short list for this year:
- Change my halyards to be internal giving me a spare jib and main halyard on the mainmast and a spare mizzen halyard or mizzen staysail halyard on the mizzen.
- Install all the hardware for reefing on both booms, moving the sail raising and lowering controls to the masts.
- Install a new Garhauer traveler for the main. They have a really nice one for the 424. This is sort of a gimme - it's not strictly necessary.
- Install the new deck fill fittings I purchased from Marine Parts Depot
- New sails from Somerset Sails.
- Move all the in-hull navigation lights to the pulpits and fill in the holes created. This is important for offshore sailing and for the longevity of the lights. I'm also replacing all the bulbs with LEDs from Dr. LED.
- Build new holding tank and install related equipment. Get rid of ElectroSan.
- Replace failing solar panel and install additional ones on the seahoods of the two companionways.
- Repair gelcoat on main deck.
That covers it for this year. They're all big jobs and they're not necessarily in order.
In the beginning of January, I will have finished all my paperwork for my Master's license. I've been down to the Coast Guard station in New York City and started all my stuff. I'm a pee in a cup away - that's the required drug test that I let expire. Silly me.
My friend Cory may be getting more delivery jobs and I'd like to go with him - it's an opportunity to go boating and get paid for it. I like that. And I'll get some really good offshore experience.
I guess winter is a time for reflection. Mostly because it's too damn cold to sit around outside. Still, I manage trips to the marina office to shoot the breeze with Rick and have some coffee. He's really good about that. Always a fresh pot. What could be better?
I expect to pick up a more modern digital camera this weekend so that it's not such a big deal carrying it around. My current one is 3 megapixels, and I'm looking for a 7mp one. Two years ago, that would have been $1000. Now it's less than $200.
If this post seems to be all over the map, well, that's because it is. I could go out in the cockpit and measure for my mizzen, but, well, it's hard to get myself together to do it. I'm looking forward to my little vacation. Very exciting.
If any of you are going to be on the Coventry Canal, I'll see you on the water! Otherwise, stay warm (or cool if you're in a hot place), have an extraordinary holiday season. Think about this: we'll all be out on the water real soon!
Wednesday, November 14, 2007
Kudos, New Stuff, and Where You Can Get Deals
I know I haven't finished the saga of the 2007 vacation, leaving all who care biting their nails to the quick. I will complete the trilogy without a doubt. Before that happens I have some stuff to pass along.
I've moved Pelican from the City Island Yacht Club to its winter slip at Avalon at Stamford Harbor Marina. During a visit by my sister and brother-in-law from England for a family reunion, I got a call from my friend Herb. I'd been looking for a winter slip and the prices for the marinas I know of were totally off the wall.
Herb indicated he'd been talking to one of the people at Harbor House who'd heard about Avalon and their unbelievable rate of $850.00 for the winter plus $300 for electricity (or $50 per month). Contrast that to Harbor House at $50/foot plus $10 per day for electricity - on a 42 foot boat, or Yacht Haven at $60/ft plus metered electricity.
I was leaning towards Yacht Haven because they metered the electricity - if I use $300 per month, fine, I'll pay for it, but if I don't, why should I? That's just stupid. And Harbor House has meters, they're just incapable of reading them.
Anyway, I met with the managers of Avalon, Jacqui and Rick, who are the nicest people you could imagine. Jacqui actually runs the marina and Rick manages the Sailing Specialties brokerage in Stamford. They live aboard their own boat.
So, of course, I signed the contract - $1200 for the winter in water with electricity! Very nice.
Jacqui and Rick have the right idea about marinas and charges. Kudos to them!
Now on to some really good sites:
First, a lot of my deck hardware like fills and so forth are aluminum with plastic caps. They look terrible, and the caps are pretty well destroyed from UV exposure. I decided to look into replacing them. I found Marine Parts Depot who supply a large assortment of really nice stainless steel hardware. They're currently having a sale and here's the coupon number to use if you are going to purchase anything: MPD002. I don't know for how long it's good for, but it's for an additional 15% off already incredible prices.
I ordered deck hold downs ($19 each), two mast steps ($18 each), and four deck fills ($17 each). They're beautiful and perhaps 20% the cost from anywhere else.
I mounted the mast steps on the mizzen so I could reach the sail head without stepping on the winches. The deck hold downs are for the cabin sole openings - I plan on going offshore and it's a SOLAS requirement. More on that in another entry.
I've joined the Pearson 424 mailing list, and from them I got the information for a company (actually one man) who makes silicon bronze manufacturer's plates for Pearsons as well as the funky hinges they had custom cast. The company is Bristol Bronze and Roger is a font of information - especially where it comes to using bronze fittings. I suspect that if you needed custom fittings, he'd be the go-to guy for them. I ordered both the plaque and the hinges. What the hell, it's only money!
Pelican's wheel is too small to sit comfortably and steer her. It's 36" diameter and with the dodger, I can't see where I'm going. More to the point I like sitting either on the windward or leeward combing to steer - I wanted a bigger wheel so I could reach it from there. There's more than enough room in the cockpit to put one in, and when I met the owner of hull #1, I saw he had a 48" wheel. Edson wants something like $900 for one. It's still cheaper than modifying the dodger, but it's a lot of money for a shoestring operation.
I found one at Second Wave Marine Consignment and am currently awaiting it's arrival. They are nice, knowledgeable, and helpful. Also, the cost with shipping is less than 1/2 a new one - and wheels that aren't bent or broken don't wear out.
Finally, for today anyway, my friend Laura gave me a copy of her friend's book, "Offshore Sailing" by Bill Seifert. I know he's gotten Laura's boat ready for the Newport- Bermuda races and Marion-Bermuda races, and I agree with just about everything he has to say (anyone who agrees that silicone sealant has no business on a boat is a-ok in my book).
Highly recommended.
I'm hunkered down for the winter where I'll install all the goodies I've purchased. Including my extraordinary deal for a Fairclough cover. Amazing. More on that later.
Since it is that time of year I won't see you on the water, but I will see you in the bar, no doubt!
Sunday, October 28, 2007
Hadley Harbor and The Sucking Muck of Death
When last we left our intrepid travelers, they had just arrived in Hadley Harbor, about a mile and a half southwest of Woods Hole Oceanographic Institute. It consists of a small harbor surrounded by Naushon Island to the southwest, Nonamessett Island to the east, and Bull Island to the north.
There are people who live on both Naushon Island and Nonamessett Island and there is a something like a commercial dock on Naushon.
We arrived around 11am before the crowds and as I mentioned got moorings. Laura and Cory immediately set to go fishing and I kyacking. I circumnavigated Bull Island and went nearly out to the channel to Woods Hole.
On the way back, I was going down a channel to explore and I noticed two signs - "Cable Area - Do Not Anchor" and right smack in line with the two signs was, guess what?, a great big powerboat with it's anchor down. "Nice", I thought to myself. I wish I could be so oblivious.
It was a beautiful day! Incredible blue skies. Puffy white clouds. Colors so sharp and crisp. Like being in a different world.
Soon we all returned to our boats and decided to go clamming. The tide was ebbing and we left in the dinghy through the cut between Naushon Island and Uncatena Island towards a beach we knew of.
Cory decided to stop where we saw some shells indicating there may be clams. When we got out of the dinghy we sank up to our calves in mud. Very carefully we waded ashore, but in the meantime I had had to remove my sandals because they were getting sucked off in the mud. Just so you know, I hate mud. I really hate sinking in mud. Keep that in mind.
Anyway, I left my sandals in the dinghy and when I got ashore, I found that walking was difficult on shells barefooted. Cory and Laura went farther on to another beach and since they had already started looking for clams, I decided to go back and bring the dinghy around to them.
Mistake #1. Recovering the dinghy alone. If you're with people, they should know where you are - and what you're doing. Duh.
Mistake #2. When you're walking in snow, walk in someone else's footsteps. When you're walking in mud do not do that. Of course, that's what I did. Halfway to the dinghy I was up to my crotch in mud and every time I tried to get one leg out, the other would just sink farther. This caused great consternation because when your legs can't shift your balance is affected.
Now, I was crotch deep in mud, and worried about falling over because putting my hands out would not stop me as they would just stick in the mud, too. Even though the water was only about six inches deep, I was getting concerned about this - well, more than concerned. It would be a less than spectacular ending to a great vacation - this drowning in muck.
You're probably wondering how I got out. Well, sir, I didn't.
Just kidding. Here's how you get out of that amount of mud: very carefully. The key is to get one leg out by moving it slightly right and left and fore and back. Point toes down, and slowly draw that leg out. Move it to where no one stepped. Be careful because if you fall, getting up will be difficult. The biggest thing is: Don't Panic.
Eventually, I got out and got to the dinghy where I used its buoyancy to get the heck out.
So, I brought the dinghy around to where Laura and Cory were and washed off all the mud. Here the seabed was sand and it was much easier to get around. Off to the west was Buzzards Bay. It was stupifyingly beautiful. You just had to look there slack-jawed.
As it turns out, we couldn't find any clams. Apparently, someone had looked there and decided it wasn't a good spot. But Cory found mussels and oysters! Woohoo! We love them! So we picked a bucket full of both of them - leaving the small ones and the very large ones. Not that there was a dearth of either. But I never knew where to find them and now I do! What a lesson!
After a while we headed back to the boats where I volunteered to host the party, as I had a grill. So I set up, and we had a blast! Melted butter, grilled oysters, and steamed mussels. Then I made a mussels marinara with spaghetti. We ate like kings and queens and went through three bottles of wine! It was terrific. And messy. Very messy. But great fun. I learned how to get oysters open.
Man, that is living!
The next day, we hopped fooled around in Hadley and then headed for Onset, MA, only about an hour away. There was no wind. We had arranged for a slip at the Point Providence Yacht Club which is a great stopping point for anyone. They are very friendly, fairly priced, and they have Friday night fish fry dinners for like $15.00. Drinks are 2 or 3 bucks at the club bar. Man, oh man, we ate like there was no tomorrow.
But for lunch we had steamed mussels left over from Hadley Harbor - Cory towed them behind in a mesh bag. So, I guess I'll have to get one of those.
Cory and Laura's friends were going to meet us for the weekend, this being Friday, and sail around and meet people in Sandwich. Laura knows people everywhere. Amazing. I decided to ride my bike to the store to get some supplies. There is an easy way to get there and a hard, dangerous way. Guess which way I took. The way back was much less frightening.
Saturday morning, Laura's friends showed up and we left for New Bedford. As we were leaving the harbor I found out my autopilot wasn't working as whenever I put it on "Auto" the boat would go in circles. Not terribly helpful. So I had to hand steer downwind all the way in light winds.
When I finally got there 6 hours later and rafted up with Cassiopeia, I had only two things on my mind - peeing and eating in that order. Laura and crew went to tour the harbor and I had a bit of a nap. I was awakened by talking right near the boat - too near. I popped my head out and I met the owner of hull #1 of the 424s! We talked for a bit and then he was on his way. He had never met anyone with a hull number close to his. Mine's number 8.
We later had dinner aboard Cassiopeia, and while the guys watched "Borat" and drank, the women went to bed. They were the smart ones.
Next morning: Off to town for breakfast at a little hole in the wall that made really good food. I had eggs and linguica, pronounced linguisa. It's Portuguese sausage that tastes like Slim-Jim. Good. Mmmm.
After breakfast, we left to go through the Cape Cod Canal to Sandwich where we were meeting Laura's friends for a barbecue and no small amount of drinking. More on Sandwich in the next vacation installment.
Winter is coming and Pelican is safely ensconced in her winter slip at Avalon Marina, in Stamford, CT. What a lovely place! The managers are boaters and amazingly friendly people. They are the best! I may stay here in the summer so I can finish Pelican's upgrades. More on that later, too.
The potable water pump failed the other day and I replaced it with a Jabsco VSD pump. It's quiet, and varies it's speed according to the demand. It's really great and it's worth every penny. Here it is from Defender: http://www.defender.com/product.jsp?path=-1|51|299222|121271|316442&id=121735 If you have to get a new pump, this is the puppy. If you've already have pressure tank, then just get a regular pump. But if you've been haunted by a cycling diaphragm pump, this is a good replacement.
Sadly, I probably won't be on the water for a while - so I'll see you on the dock!
Thursday, October 04, 2007
A Plug
I know you're all breathlessly awaiting the next vacation installment, but in the meantime I've been working on the boat doing various projects.
Power usage has always been a bugaboo for me. Since I live aboard and aboard in the summer is on a mooring, I'd prefer not to have to run a generator or the engine every night. So until I got some new lighting, I was being very cautious with my use of internal lighting.
The Pearson 424 has a number of standard overhead round lights, as well as some classic vintage '70's lights made out of what looks like small Clorox® bottles. They have Edison fittings (like you have with screw-in incandescent bulbs at home) and they draw about an amp and a half each. The overhead lights only a little bit less.
So to have a cheery interior you're looking at a current draw of nearly 10 amps! That is more than the autopilot, instruments, and radar all together draw!
I've mentioned Sailor Solutions before. They have lots of neat and useful stuff for boats that you can't find elsewhere. But their big product is their Sensibulb™ , a LED light engineered to provide very nearly identical light as an incandescent at much lower temperature and 1/10th or so the current draw - which means I can light the whole boat up like a Christmas tree for just about the same current draw as one of the old bulbs.
I now wallow in light. Read for hours. I love it. You can check out what I did with the normal white LEDs on Inertia on a previous post. As pleasant as that was, this is doubly so.
The only downside is the cost: They are about $40.00 each. However, if you take into account they're rated at 10,000 hours and the wear and tear on your generator or engine they save will be paid back. Also: you don't have to purchase new bulbs every couple of years.
They provide a warm, soft, yellow light that is nearly indistinguishable from normal lighting. The Sensibulb™ plugs into a normal halogen bulb socket. Sailor's Solutions provides socket adapters for all types of sockets at a reasonable price (although the Edison ones are becoming rare). They also provide full light fixtures with dimmers (yes! they can be dimmed!)
If you're thinking of updating your interior lighting, these are the bulbs. I can't recommend them enough. You'll be happy as a clam bathing in your low current light!
See you on the water!
Sunday, September 02, 2007
Point Judith to Hadley Harbor
On the eastern end of the Cape Cod Canal is a small marina, marked on the chart as a harbor of refuge, in Sandwich MA, called appropriately enough, 'The Sandwich Marina'. This little hole is all there is for protection from the Cape Cod Sound - which, I'm told, can be very nasty indeed.
It's not very big, but right nearby is a great seafood store and a pretty good seafood restaurant. They're called 'Sam's Seafood Store' and 'Joe's Seafood Restaurant'.
"But, " you may think to yourself, "how did you get there? When last we heard you were at Point Judith!"
Ah, that is the story you are about to be told.
After I arrived in Point Judith, I set about kyacking about the place. In my travels, I met a lobsterman and while he pulled traps we talked of this and that. He has about 120 traps in the harbor of refuge and works them manually. This day, however, his traps were empty because someone else had emptied them! I would have been pissed off, but he seemed merely miffed. Said it wasn't the first time and probably wouldn't be the last. He also told me there was going to be a lunar eclipse the next morning around 5:10.
About 9:30pm Cassiopeia sailed in and tied up to me. We had a drink under a beautiful moon to celebrate the vacation, and then went to bed. I awoke at 4:30 and thought, "I'll just get a bit more sleep - then see the eclipse." And so I did - get more sleep, not waking until 7:00. Ah well, it is vacation after all.
We left on the tide for Cuttyhunk that morning and with the wind too light to sail, we motored on over. There are two entrances, one on the west opening to Buzzards Bay, and one on the east opening onto the Vineyard Sound. If you have a choice, take the Buzzards Bay one - the eastern passage is very short, but very narrow and I'm told, tricky.
We anchored in the inside harbor that evening (Tuesday) where it wasn't at all crowded. We took the dinghy out to the east side of the island and Cory and I went swimming and snorkeling. It was beautiful! Spectacular. While we're swimming about, we saw some large fish we couldn't identify.
As I'm swimming about, a fisherman in a kyack paddles by - realize we're out in a surf zone probably a half mile off shore. I struck up a conversation with him and asked what kind of fish they were, and found they were black (or ocean) bass and tautog. The thing about this little adventure is the appearance out of nowhere of the fisherman with the answer to the question weighing most heavily on your mind. Talk about synchronicity.
Laura and Cory had caught a bluefish on the way out and which we had that for dinner. And a ratatouille Laura made with their home-grown vegetables. Maybe it was the long day, the fresh sea air, or the food was just really good, but we were totally satisfied.
On Wednesday morning, Laura and Cory went fishing and I kyacked into town. I figured I'd have a walk around the island and see what I could see. Cuttyhunk is a little jewel of an island with a little market, and one hill. There's also a Bed and Breakfast on the mid-east side of the island. Since there's only 5 roads that all meet near the dock, it's very hard to get lost. There are a few tourist like shops, but generally, not too much.
What is interesting is that there are no cars on the island; the main method of transportation is ATV and gas powered golf carts or 4 wheeler carts. It's very cool. On the southwest side of the island is a clam/oyster farm. They supply the seafood place on the dock.
I got some stuff at the market and headed back to the boat. Laura and Cory came back shortly thereafter. After a quick lunch and the most interesting discussion of the construction of sandwiches (Laura's a kind of 'fling-it-together' sandwich maker, and Cory isn't), we all headed off to see if we could spear some of the fish we saw Tuesday.
Well, no luck. On the way back Cory decided to look for clams. I don't know why. But we found them near the anchorage! We found a bunch! So we had steamed clams before dinner! They were great - so sweet. You can't believe the difference between just harvested clams and store or restaurant bought.
Anyway, Cory had installed a flat-screen TV and digital antenna so we watched the news and had a bunch of wine to drink. Also, Port and Chocolate.
It turns out that the bed and breakfast on Cuttyhunk is called "The Fisherman's Club" and nothing would do but that we go have breakfast there before heading off to Hadley Harbor. The walk is about a mile from the dinghy dock. It has a huge yard with a volley ball net and spectacular views of Martha's Vineyard, the Vineyard sound and a small island called 'No Man's Land' - apparently a practice target island for many years. The breakfast was delicious and the staff comely.
It is a beautiful B&B that really was a fisherman's club.
 Waddling back to the boats, we readied for our exodus and left. After getting back to Buzzards Bay, I decided there was some wind, dammit, so I'm going to sail. At this point the autopilot was sort of working. It was only working on certain headings and I happened to be on one of them. So up went all the sails and Cassiopeia in the form of Cory was kind enough to take a bunch of pictures. (See nice one on left....)
 There wasn't a bunch of wind but it was very nice to sail. Although Pelican motors very well, it sails better. It's taken some getting used to - it isn't like my previous boats; the best I can do is compare it to driving. My former boats, Inertia and Wind Hawk were like sports cars. Their handling was quick and precise. In the case of Wind Hawk, you could almost say 'twitchy'. Pelican handles like a Cadillac. It will go where you want it to but it will do it in it's own time. It's a very different feeling for me, but I'm getting used to it.
After a couple of hours, the wind died and the current turned foul so using the iron genny we proceeded to Hadley Harbor - it's about a mile south of Woods Hole and it is surrounded by lovely little islands. There are free moorings there on a first-come first-serve basis.
We were lucky enough to get moorings.
Next time: Hadley Harbor and Death in the Muck
It's still sailing season, so I'll see you on the water!
Monday, August 27, 2007
Vacation Starts
 Here I am anchored at Point Judith Harbor of Refuge. It is my third pleasant and unhurried day of cruising. Tonight, Laura and Cory will tie up and tomorrow we'll be heading to Cuttyhunk in the Elizabeth Island chain.
If Cape Cod is an arm, then the Elizabeth Islands are the armpit hair. I use that imagery just so you know where it is. They start at Woods Hole (where the eponymous oceanographic institute is) and continue down past Tarpaulin Cove on Naushon Island and Cuttyhuck Island where Cuttyhunk is, ending at Gosnold Island. The island chain separates Buzzards Bay from the Vineyard Sound.
Pelican has performed impeccably - all the instruments are doing exactly what they're supposed to do, although the autopilot went sort of nuts around Noank/Mystic last night. All of a sudden it couldn't figure out a magnetic course. Pretty strange, but once I left there it was ok.
I left Saturday around noon from City Island and because it was beastly hot and humid with no wind, I motored for 6 hours and dropped anchor behind Charles Island, outside of Milford Connecticut. As uncomfortable as the day was, the night was very cool with just enough breeze. Lovely sleeping weather. In fact, so far, that's been the case every night.
All this lovelyness cannot go untainted, however, and the payback comes in the form of biting flies. They attack a boat somewhere around Middle Ground (Stratford Shoals) which is between Bridgeport CT and Port Jefferson, Long Island. I thought it might be just me because during the day before my shower I can be, um, ripe. But my friend Sylvia experienced them and so are Laura and Cory - we've never seen them so bad.
Yesterday between Milford and Noank I must have killed a couple of hundred of them - they just kept coming! And biting. Somehow they know where your ankles are and that's what they go for. It turns out I have an old cap that covers the binnacle compass that is the perfect weapon. It kills without schmearing. And most of what would get schmeared would be my blood. In any case, the cockpit floor was so littered with dead flies that I had to rinse it down. Twice under way and once again when I got to Noank. Yuck.
Today, Monday, it was better because there was some breeze so they tended to stay put. Makes the easy targets. I only had to kill a dozen or so and I was good. They are just awful!
I haven't experienced flies like this since the horrible trip from Norfolk on a fly infested boat (they had laid their eggs in the sail cover, and literally covered the boat). We solved the problem by jettisoning the sail cover, dragging the mainsail behind us for a few miles, and covering ourselves in diesel fuel. But that's another story.
Today started out as a sailing day, but the wind got lighter and lighter and Pelican just does not do well upwind in light air. You can imagine. So I motored for about three hours to this idyllic spot. Point Judith.
It's quiet, pretty, and the sound of the waves against the breakwater is just like you'd imagine. Normally in an anchorage it's quiet - the lapping of the water on the hull, noises from nearby woods or homes or cars, but here, because it's not seen as a 'destination', it's very pleasant. And so far, empty. I really like it here.
If we get going tomorrow, it's to Cuttyhunk. I hope we can sail. I hate motoring my vacation away....
Tuesday, August 21, 2007
A Beautiful Solution
I'm all about simplicity. I have a low tolerance for frustration. And I am easily surprised by engineering decisions that are obviously bad.
That said, boating offers some spectacularly horrendous examples of what I call 'That Should Work' solutions - usually taken as an expedient fix with the idea that it'll get taken care of correctly later. But when a boat is built with these 'Gotchas' I am truly amazed.
Here's a case in point - Pelican has three water tanks, one each 50 gallons under the port and starboard settees in the main cabin and one 60 gallon tank under the v-berth. So far, so good. But the vents are not overboard - that's also a pretty good idea except in this case when the port tank vents into a hidden space, the starboard into a hanging locker, and I haven't found the vent for the bow tank yet.
Rerouting the vent is no problem - I've rerouted them to the bilge which is not the best idea but is better than venting into your clothes or somewhere else. I may change them to vent into the forward cabin's sink, which is the best solution. But that was a stupid engineering/builder decision.
 The next issue is one of inappropriate engineering. When you're venting into hidden spaces, you need to know how much water is in the tank to prevent an overflow. So someone - Either Pearson or a previous owner decided to put a clear plastic deckplate into the tanks so they could ostensibly clean the tank and see how much water was in it during filling. Sounds like an idea, right? Except those plates are designed around keeping water out of something, not in.
More to the point, to get to it you have to remove all the cushions and slide the berth extension out. How about not needing to do that each time you fill the tank, eh?
If you inadvertently fill the tank above the top but not enough to spill out the vent some three feet above the tank, you put approximately 1.3 psi on the tank, and that results on a total force of about 16 pounds over a 4" diameter inspection plate. That is enough to make it leak. And that doesn't take into effect the dynamic loading of water splashing about.
Ok, you say, you've lowered the vent. That should help, but the fill is 1.5" and the vent 5/8", so you could have a standing column that can essentially pressurize the tank to some 3psi including the dynamic loading of the force of the water - so even with the vent there will be leaking around the plate.

 So what's the solution? This is great. Brewer's Post Road Marina's maintenance manager turned me onto this product that will work on any tank that doesn't involve explosive liquids like gasoline. SeaBuilt makes real, honest inspection plates out of stainless steel or aluminum.
They consist of a split back plate held together with a rubber gasket, a separate gasket for the top, and of course, a plate that's bolted on.
 Installation is as simple as simple can be. If you don't have a hole in the tank, cut one or drill it with a hole saw, drill the 3/8" holes in the pattern of the top plate, fold the internal ring at the gasket and insert it
 into the hole, push 1/2 up through the holes you drilled and place the top gasket over the bolts to hold the thing up. Then you unfold the bottom plate, do the same with those bolts. Finally put the plate on with the supplied washers and nuts (they even supply an extra set to replace the ones your going to drop in the bilge), snug them down and you're done.
 If you're handy with power tools, it'll take you about an hour. If you're not, maybe an hour and a half. It's that easy and you will have an real inspection plate that can take the same or more pressure than the tank it's in. Highly recommended.
Next: Installing instruments, frustration associated with that and living out of the water, and the good people at Raymarine.
My cruise starts next weekend, and I'll be seeing you on the water!
Saturday, August 11, 2007
Alarums in the Night, and Other Projects
The new boat's been a whirlwind of work. Work's been a whirlwind of work. Selling my house and moving to the boat has been, well, a whirlwind of work. At least that's my excuse for not writing more sooner.
Where to start? I've moved to the boat. And closed on my house so I have money, which of course, will be put partially into the boat. I can't think of anything as satisfying as spending money on the boat. Especially big ticket items that I had already budgeted for. I know there's the whole boat-budget dichotomy, perhaps an oxymoron.
In any case, the current projects are installing the autopilot, chart plotter and instruments. But there's a roundabout story how that's all coming about.
Last weekend I decided to go sailing. I left City Island to meet friends in Cold Spring Harbor - a lovely anchorage that is only exposed directly to the north. Clean and quiet it is the site of the former Louis Comfort Tiffany artist colony/estate. I got to be the mother ship with my friend Lou and guests rafting up.
It was really cool to drop the big 60 lb anchor with the chain and just stick there. Anchoring on the north shore of Long Island is almost universally easy. Pretty much any anchor will hold. But letting go of all that chain! It's a special sound. A manly sound for a manly boat! Arrggh, matey!
Ok, the evening progressed more or less as you might expect with much food, G&T's, wine and good company. It was a murderously hot day, and we spent a good deal of it in the water. The evening cooled down very nicely. Just the way I like it.
Anyway, the next morning the wind was up so taking one of Lou's crew, Andy, we sailed off back to City Island. As is always the case on the Sound, about 10am the wind died. So I started the engine and Andy and I motored back. Just at the southern tip of City Island (within site of my mooring), the engine died. No wind, no engine. No current, thankfully, but we weren't going anywhere.
Just at the point of deciding to get towed in, a small 3-5 knot breeze came up and we were off! Slowly at first, and then more slowly. Two hours later we were almost to the mooring when the wind changed direction requiring some fast thinking by the launch operator. Let's just say my judgment is better now.
Now, when the engine stalled, I drained and cleaned the Racor fuel bowl. But after that no fuel would come in. That's a problem. What could it be? The fuel was old, and the goop that had been in the fuel could have been the culprit. That means 65 gallons of contaminated fuel to get rid of. Or, the tank, despite showing 3/4 full on the meter, could be empty. Lou lent me 5 gallons of fuel and after spilling a fair portion of it, at least 4 got into the tank, but still no joy.
That means the tank is full of junk and I have a big problem. Well, a great deal of wailing and gnashing of teeth, I found a yard that will, 1. haul me, and 2. let me dispose of the fuel. Kudos to them. A smack in the teeth to the yards I contacted that would only haul on the condition I let them work on my boat. You yards know who you are. Shame on you.
So Laura's husband, Cory, popped down Monday to help me rig a gerry can to the engine so I could get somewhere - most notably to the yard, and allow me to charge the batteries. Living on the mooring is fraught with issues, eh?
We started at the racor and worked our way back to the fuel tank to see where the line was plugged. Someone had installed a lift pump in the racor suction so that you could dispense with bleeding the engine when you change the racor. Well, a pump with no inlet filter is asking for trouble, especially where fuel with stuff in it is concerned. And that was the culprit. The pump was jammed.
This brings up another issue. If, for some reason you start wiring with a particular color wire, get enough to do the whole job. This pump had a purple wire connected to it. Fine. Run it all the way to the power source. Somewhere in a conduit, it changed color to red, and then went to the engine control panel. How stupid is that? Fortunately I've dug around in the wiring enough to notice there was extra wires on the panel. This was one of them.
Anyway, problem solved. Engine runs. All is good with the world. In the meantime, I ordered a Honda EU2000i generator from Wise Sales who were very nice, competitive and shipped that day - I got the generator Thursday after ordering it Tuesday. Marvelous! Even though I didn't need it, I had to try it out.
First, it comes without oil, as you'd expect. The oil fill is the most ridiculous design possible. You have to lay the generator on its side to fill the oil. It takes .4 quart. Can you measure .4 quarts? I thought not. The way you know it's full is to stand it up and see if it runs out the fill. When it stops running out, it's perfect.
What does that mean? It means you're going to get oil all over the place. Why not use a funnel? Because the fill is not vertical - it's nearly horizontal. Not the best design.
Remember I mentioned most of Lou's fuel got into the fuel tank? Well, if you haven't bought a fuel can recently, you can't without device that prevents it from leaking or spilling when the can is tilted. All fine and good except it's quite possibly the worst design I could imagine -you have to hook the filler on the device to be filled and press down on it to open the valve. This virtually guarantees you'll spill the fuel. In an effort to save the environment, the designers have made sure you're going to spill. It's the stupidest thing I've seen all week. A smack in the teeth to whoever thought it would be a good idea.
But once oiled (and cleaned up after), and fueled (and cleaned up after), it runs like a top! It's quiet, and man, oh man, it charges the batteries, runs the AC loads except the water heater, and what fun! I'm ticked pink. But with electricity. It's the generator of choice for cruisers without shipboard mounted diesel generators.
I still want a wind generator... But that's next year.
Today's project is to put LEDs on the 12v power panel so you can see at a glance what's on. When my panel was made 30 years ago, LEDs were very expensive. Now from Plasma LEDs you can get a whole bag of them for $50.00.


They're simple to put in - drill a hole with a #3 drill, stick the LED in the hole from the back and using silicone or crazy glue stick the LED to the panel back. Connect the red wire to the LOAD side of the breaker or switch and the black wire to a ground, and hey! presto! a circuit monitor light. Cheap, easy, and quick. Pictures to follow on an edit as I'm still waiting for the silicone to set.
A final note on the results - perhaps you don't need the brightest LEDs available. At night they light up the aft cabin pretty well, especially if you have four or more circuits on....
This is one of the very few uses for silicone sealant on board a boat. Using it as a sealant virtually guarantees a leak and worst, also guarantees that the next adhesive you use to fix the problem won't adhere without some serious work. It's bad mojo all the way around. The only other use I can think of is to put a dab on cotter pins on the standing rigging so you don't have to bend them around in circles and they are easy to remove. But that's it.
Monday is the haul out, and the start of the new instrumentation.
The last week of August is the start of my cruise, and I will definitely see you on the water!
Tuesday, July 17, 2007
How A Simple Job Becomes Three Days of Torture
A simple job: Install a Xantrex Freedom 20 inverter/charger and Link 2000 monitor. Stated in a sentence of a few words. A couple of hours, done deal, right? Maybe a day.
"But wait," you say, "Nothing takes a few hours on a boat." And you'd be right.
First, one must have a vision of what one wants to do. So here's the vision:
The first issue was to figure out the current wiring. Because the battery switch decidedly did not turn off power to the boat it became a priority to fix that. The next was to figure out the best way of wiring the batteries so that the banks were appropriate and measure for the new battery. Finally, because the old battery charger was seen as a 120 AC load off the panel rather than being in the circuit from the shore power, remove the wiring and insert the inverter/charger in its place.
The nice thing about the Xantrex Freedom 20 is that when shore power is applied it acts like a charger with all sorts of fancy functions. When off shore power, it can provide power to all the 120vac outlets through the inverter. It has automatic switchover, so you never have to worry. But it is also controllable in the event you don't want to charge your batteries or run the inverter. It also has an echo charger for the second battery bank.
The Link 2000 is the remote control for the Freedom 20, and it does all sorts of monitoring for two battery banks.
Jack Rabbit Marine provides a kit with all the stuff you need to do the job except incidentals like wire and connectors. Fortunately, there's Bridge Marine on City Island who supply pretty much everything at really good prices. Like Defenders and West Marine used to be. Moreover, they're nice and knowledgeable.
By Friday evening, I figured out where everything was going to go, how I was going to route wires and cables, and had cut a hole in the panel above the nav station to install the Link 2000. I also had removed the old Datamarine log meter that was non-functional. Unfortunately, that leaves a 4" hole in the panel. I'll deal with that later.
One of the problems of a 30 year old boat is that over the years people add stuff. And to put it delicately, they are not always so careful about how they do it. Wires are strapped to other wires or run in the easiest manner even if it doesn't make sense particularly. We all do it - how often have you said after completing a job, "Ah, I'll straighten that all up later. It's cocktail hour." Somehow, later never comes. I was/am determined not to fall in that trap too far.
Saturday I spent removing old cables that weren't needed, for example the 120 VAC line to the battery charger, the two separate sets of cables from the original 4D batteries (one each positive and negative), and one ground cable of the two to the engine. Fortunately, some could be re-routed to be used again for something else. Also, I found that the newer battery (the 8D ) was wired directly to the 'Common' of the battery switch meaning 12v power could never be turned off.
After a trip to Bridge Marine and some $200 later, with 25 feet each of red and black 1/0 cable (big wire), a mess of crimp on ends, and a few other little items, I was ready to install the new starter battery and run its cables over to the hanging locker that doubles as a wiring closet (or is it the other way around?) I also removed the battery charger so I could install the Freedom 2000 in its place.
What's amazing is the new gear is lighter than the old and does much more! Pretty cool. And there are lights on it. What could be better? Maybe some knobs. They don't really have to do anything, but should go all the way to 11. But I digress.
By Saturday evening, the following had been accomplished:
Since I was running my portable refrigerator, I had to keep at least one battery hooked up, or if none, only for a short time. It is important to keep the wine and cheese at the appropriate temperature...
Sunday was spent wiring the Link 2000 monitor/remote control into the system. It sounds simple in that there's only like 8 wires, but I had to mount a terminal block behind the electrical panel, run the extension cable to the shunt, and then two wires back across the boat to the third battery. All very easy, all very time consuming.
The final task was to replace the 120VAC line from the deck socket to the Freedom 20, and thence from there to the AC main breaker in the power panel. Remember, the Freedom inverter/charger auto switches the ship's AC from inverter to shore and back.
 I was going to provide the before and after wiring diagram, but it's too big a pain. Why would you want to know the wrong way to do it? Here is the final wiring. A final note - the current gel batteries were old, in two cases, from the mid '90's. So I replaced them with three 4D AGM batteries. It turns out that the solar panel controller was never providing the proper voltage for charging, so during the day it was running the 'fridge, but never adding to the power available.
With the new batteries I have 600 amp hours to fool with. Just so you know, an 8D battery weighs 160 lbs. A 4D battery a mere 120 lbs. I found out I could still lift and carry them! But still, I rigged up a block and tackle to get them off the boat at the end of the main boom. No sense doing something stupid...
Now I can get out - and I'll see you on the water.
"But wait," you say, "Nothing takes a few hours on a boat." And you'd be right.
First, one must have a vision of what one wants to do. So here's the vision:
- Take the 2 - 4D batteries and the 8D and make them one bank.
- Add a Group 29 battery as the starter/emergency bank
- Install the Xantrex Freedom 20 inverter/charger
- Install the Xantrex Link 2000 monitor/remote control (for the inverter)
The first issue was to figure out the current wiring. Because the battery switch decidedly did not turn off power to the boat it became a priority to fix that. The next was to figure out the best way of wiring the batteries so that the banks were appropriate and measure for the new battery. Finally, because the old battery charger was seen as a 120 AC load off the panel rather than being in the circuit from the shore power, remove the wiring and insert the inverter/charger in its place.
The nice thing about the Xantrex Freedom 20 is that when shore power is applied it acts like a charger with all sorts of fancy functions. When off shore power, it can provide power to all the 120vac outlets through the inverter. It has automatic switchover, so you never have to worry. But it is also controllable in the event you don't want to charge your batteries or run the inverter. It also has an echo charger for the second battery bank.
The Link 2000 is the remote control for the Freedom 20, and it does all sorts of monitoring for two battery banks.
Jack Rabbit Marine provides a kit with all the stuff you need to do the job except incidentals like wire and connectors. Fortunately, there's Bridge Marine on City Island who supply pretty much everything at really good prices. Like Defenders and West Marine used to be. Moreover, they're nice and knowledgeable.
By Friday evening, I figured out where everything was going to go, how I was going to route wires and cables, and had cut a hole in the panel above the nav station to install the Link 2000. I also had removed the old Datamarine log meter that was non-functional. Unfortunately, that leaves a 4" hole in the panel. I'll deal with that later.
One of the problems of a 30 year old boat is that over the years people add stuff. And to put it delicately, they are not always so careful about how they do it. Wires are strapped to other wires or run in the easiest manner even if it doesn't make sense particularly. We all do it - how often have you said after completing a job, "Ah, I'll straighten that all up later. It's cocktail hour." Somehow, later never comes. I was/am determined not to fall in that trap too far.
Saturday I spent removing old cables that weren't needed, for example the 120 VAC line to the battery charger, the two separate sets of cables from the original 4D batteries (one each positive and negative), and one ground cable of the two to the engine. Fortunately, some could be re-routed to be used again for something else. Also, I found that the newer battery (the 8D ) was wired directly to the 'Common' of the battery switch meaning 12v power could never be turned off.
After a trip to Bridge Marine and some $200 later, with 25 feet each of red and black 1/0 cable (big wire), a mess of crimp on ends, and a few other little items, I was ready to install the new starter battery and run its cables over to the hanging locker that doubles as a wiring closet (or is it the other way around?) I also removed the battery charger so I could install the Freedom 2000 in its place.
What's amazing is the new gear is lighter than the old and does much more! Pretty cool. And there are lights on it. What could be better? Maybe some knobs. They don't really have to do anything, but should go all the way to 11. But I digress.
By Saturday evening, the following had been accomplished:
- Mounted buss bars for ground, battery bank 1 positive, and ships switched positive
- Mounted the Link 2000
- Rewired battery bank 1 so that the positive to positive to buss bar and negative to negative to ground buss bar from opposite batteries
- Added the former battery bank 2 8D battery to battery bank 1
- Added and ran wires from the new starting battery (now bank 2) to the wiring closet
Since I was running my portable refrigerator, I had to keep at least one battery hooked up, or if none, only for a short time. It is important to keep the wine and cheese at the appropriate temperature...
Sunday was spent wiring the Link 2000 monitor/remote control into the system. It sounds simple in that there's only like 8 wires, but I had to mount a terminal block behind the electrical panel, run the extension cable to the shunt, and then two wires back across the boat to the third battery. All very easy, all very time consuming.
The final task was to replace the 120VAC line from the deck socket to the Freedom 20, and thence from there to the AC main breaker in the power panel. Remember, the Freedom inverter/charger auto switches the ship's AC from inverter to shore and back.
 I was going to provide the before and after wiring diagram, but it's too big a pain. Why would you want to know the wrong way to do it? Here is the final wiring. A final note - the current gel batteries were old, in two cases, from the mid '90's. So I replaced them with three 4D AGM batteries. It turns out that the solar panel controller was never providing the proper voltage for charging, so during the day it was running the 'fridge, but never adding to the power available.
 With the new batteries I have 600 amp hours to fool with. Just so you know, an 8D battery weighs 160 lbs. A 4D battery a mere 120 lbs. I found out I could still lift and carry them! But still, I rigged up a block and tackle to get them off the boat at the end of the main boom. No sense doing something stupid...
Now I can get out - and I'll see you on the water.
Subscribe to:
Posts (Atom)